
이 포스트는
을 따라서 작성한 Flutter Simple Chat UI 을 응용하여 좀 더 그럴듯한 채팅앱을 구현하기 위한 과정을 다룬다.
주요 내용은 이하와 같다.
- 화면 간의 데이터 전달
- 메세지 입력
- 메세지 입력에 따른 Chat Detail 화면의 디테일한 UI 수정
원문의 예제는 단순히 UI만 다루는 포스트이다 보니, 실제로 데이터를 전달하거나 저장하는 등 데이터를 처리하는 작업은 해주지 않는다. 그러므로 이번 포스트부터는 스스로 공부하며 추가한 코드이다.
관련 포스트
- Base, Chat 화면 구현
- Chat Detail 화면 구현
- 응용 01 (Chat Detail 화면) 화면 간 데이터 전달, 메세지 입력 (현재포스트)
- 응용 02 데이터 로컬 저장 및 읽기, 쓰기
- 응용 03 데이터 로컬 저장 및 읽기,쓰기_메세지로그편
환경
- MacBook Air (M1, 2020)
macOS Monterey (v12.4)
- Flutter 3.0.3
Dart 2.17.5
- Visual Studio Code 1.69.0
Chat 화면 -> Chat Detail 화면에 데이터 전달
Chat Detail 헤더 UI에 값 전달

지금은 Chat 화면의 대화상대 리스트의 어떤 개체를 선택해도 Chat Detail 화면은 위와 같이 고정 된 헤더를 가진 화면이 실행될 뿐이지만, 헤더에 내가 선택한 대화 상대의 정보가 뜨게 만들어 주고 싶다.
즉, 내가 Chat 화면의 리스트 중에서 어떤 개체를 선택하였는지, Chat Detail 화면에 전달할 필요가 있다.
기본 개념 참고한 페이지
위의 페이지는 보면 onTap 내에서 Navigator.push 를 이용하여 todo리스트의 데이터를 전달해주는 예제이다. 전달해주는 데이터만 다를 뿐, 기본 개념은 같으므로 이 예제를 보고 따라하면 문제 없이 데이터를 전달해 해줄 수 있다.
먼저, 작성한 simple chat ui 어플리케이션이 어떻게 생겨 먹었는지 그려보자.
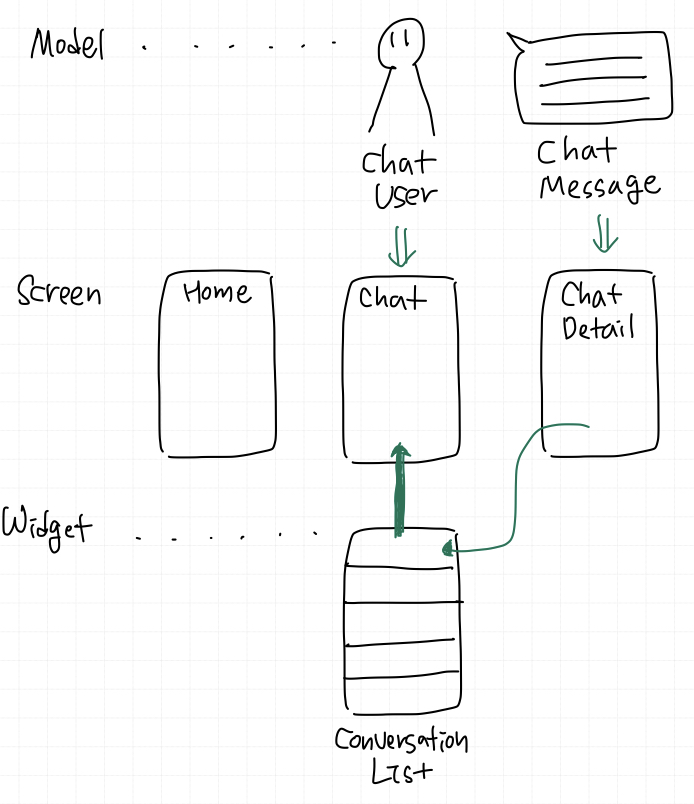
screen 인 ChatPage 안에 conversationList 위젯이 위치하고 있으며, 실질적인 리스트뷰의 출력이나 제스처 동작은 conversationList 에서 일어나고 있다는 것이 포인트다.
이제 코드를 보면 위젯인 conversationList.dart 에서 onTap 내에 이미 Navigator.push 메서드가 ChatDetailPage() 를 리턴하도록 되어 있는 것을 알수 있다.
1
2
3
4
5
      onTap: () {
        Navigator.push(context, MaterialPageRoute(builder: (context) {
          return ChatDetailPage();
        }));
      },
우리가 할 일은 Navigator.push메서드가 단순히 ChatDetailPage() 를 리턴하는 것이 아니고, ChatDetailPage()페이지에 매개변수를 전달하도록 코드를 변경하는 것이다.
chatDetailPage 페이지에 전달되어야 할 데이터는, String형태의 imageUrl과 name 이 2가지 이다. 각각 전달하는 것이 아니고, ChatUsers 객체를 전달해도 괜찮으나, 이번에는 그냥 각각 전달해 보겠다.
conversationList에서 인자를 넘겨주기 전에, ChatDetailPage에서 인자를 받을 수 있도록 정의 부터 해줘야 한다.
1
2
3
4
5
6
7
8
9
10
11
class ChatDetailPage extends StatefulWidget {
  //final ChatUsers chatuser;
  String cpname;
  String cpimageurl;

  ChatDetailPage({Key? key, required this.cpimageurl, required this.cpname})
      : super(key: key);

  @override
  _ChatDetailPageState createState() => _ChatDetailPageState();
}
@override 위 쪽에, imageurl과 name가 들어 갈 변수를 정의해 준 후, 인자로 받을 수 있도록 생성자를 작성해 주었다. imageurl과 name 둘 다 필수적인 인자이니 required 지정.
다시 conversationList로 돌아와서 인자를 전달해 주었다.
1
2
3
4
5
6
7
8
9
10
11
      onTap: () {
        Navigator.push(
            context,
            MaterialPageRoute(
              builder: (context) => ChatDetailPage(
                cpimageurl: widget.imageUrl,
                cpname: widget.name,
              ),
            )
        ;
      },
여기까지 하면, conversationList의 imageurl과 name이 chatDetailPage로 넘어간 것이다! 이제 chatDetailPage의 해당 값(imageurl과 name)을 고정값이 아닌 선언했던 변수로 바꾸어 주면 끝!
CircleAvatar의backgroundImage키의 값을"https://randomuser.me/api/portraits/men/5.jpg"에서widget.cpimageurl로 변경Text의"Kriss Benwat"를widget.cpname로 변경
이하는 헤더(appBar) 전체 코드이다.
1
2
3
4
5
6
7
8
9
10
11
12
13
14
15
16
17
18
19
20
21
22
23
24
25
26
27
28
29
30
31
32
33
34
35
36
37
38
39
40
41
42
43
44
45
46
47
48
49
50
51
52
53
54
55
56
57
58
      appBar: AppBar(
        elevation: 0,
        automaticallyImplyLeading: false,
        backgroundColor: Colors.white,
        flexibleSpace: SafeArea(
          child: Container(
            padding: EdgeInsets.only(right: 16),
            child: Row(
              children: <Widget>[
                IconButton(
                  onPressed: () {
                    Navigator.pop(context);
                  },
                  icon: Icon(
                    Icons.arrow_back,
                    color: Colors.black,
                  ),
                ),
                SizedBox(
                  width: 2,
                ),
                CircleAvatar(
                  backgroundImage: NetworkImage(widget.cpimageurl), //수정
                  maxRadius: 20,
                ),
                SizedBox(
                  width: 12,
                ),
                Expanded(
                  child: Column(
                    crossAxisAlignment: CrossAxisAlignment.start,
                    mainAxisAlignment: MainAxisAlignment.center,
                    children: <Widget>[
                      Text(
                        widget.cpname, //수정
                        style: TextStyle(
                            fontSize: 16, fontWeight: FontWeight.w600),
                      ),
                      SizedBox(
                        height: 6,
                      ),
                      Text(
                        "Online",
                        style: TextStyle(
                            color: Colors.grey.shade600, fontSize: 13),
                      ),
                    ],
                  ),
                ),
                Icon(
                  Icons.settings,
                  color: Colors.black54,
                ),
              ],
            ),
          ),
        ),
      ),
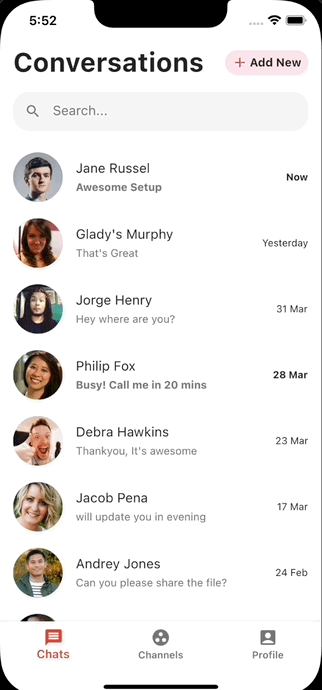
결과물을 확인해 보면, 이제 chatDetailPage 페이지 헤더에 Chat 화면의 리스트에서 클릭한 사람의 이미지와 이름이 뜨는 것을 볼 수 있다.
Chat Detail 화면 : 메세지 입력
이제 채팅을 입력하는 화면에서 실제로
- 텍스트 박스(TextField)에 메세지를 입력하고
- 송신 버튼(FloatingActionButton)을 누르면
- 메세지 로그에 입력한 메세지가 띄워지도록 해볼 것이다.
메세지를 입력하는 부분인 TextField 클래스는 controller라는 키를 가지는데, 여기에 텍스틀를 제어하는 TextEditingController 인스턴스를 지정해 줄 수 있다.
그러므로 TextEditingController 인스턴스를 선언해주고, controller 키에 만든 인스턴스를 지정하면 입력된 텍스트를 제어할 수 있게 된다.
그렇게 입력된 텍스트를, 송신 버튼을 누르면 메세지 리스트에 저장하고 싶다. 그러면 FloatingActionButton 클래스의 onPressed 키에 입력된 값을 메세지 리스트에 추가하는 코드를 써주면 된다.
일단 여기까지 입력된 텍스트가 제대로 변수에 저장이 되는지 확인해 보겠다.
먼저 _ChatDetailPageState 클래스에 TextEditingController 인스턴스를 선언
1
  final TextEditingController msgtextController = TextEditingController();
확인을 위해 debugPrint로 콘솔에 변수 값을 출력해줘봄…
1
2
3
4
5
6
7
8
9
10
11
12
13
14
15
16
17
18
19
20
21
22
23
24
25
26
27
28
                  Expanded(
                    child: TextField(
                      decoration: InputDecoration(
                          hintText: "Write message...",
                          hintStyle: TextStyle(color: Colors.black54),
                          border: InputBorder.none),
                      controller: msgtextController, //추가
                    ),
                  ),
                  SizedBox(
                    width: 15,
                  ),
                  FloatingActionButton(
                    onPressed: () {
                      ChatMessage newMsg = ChatMessage(
                          messageContent: msgtextController.text,
                          messageType: "sender"); //추가, 변수에 입력값 저장
                      debugPrint('Input text : ${newMsg.messageContent}');  //추가, 확인을 위해 콘솔에 변수값 출력
                      messages.add(newMsg); //추가, 메세지 리스트에 새로운 메세지 추가
                    },
                    child: Icon(
                      Icons.send,
                      color: Colors.white,
                      size: 18,
                    ),
                    backgroundColor: Colors.blue,
                    elevation: 0,
                  ),
위의 gif 가장 하단에 보이는 검정색 바탕 화면이 콘솔화면인데, 시뮬레이터에 입력한 값이 제대로 출력되는 것을 볼 수 있다.
이 값을 메세지 로그(바디)에 출력해 주기 위해서는 버튼을 눌렀을 때, 리스트 뷰를 다시 빌드해주는 setState() 함수를 호출하면 된다!
1
2
3
4
5
6
7
8
9
10
                  FloatingActionButton(
                    onPressed: () {
                      ChatMessage newMsg = ChatMessage(
                          messageContent: msgtextController.text,
                          messageType: "sender");
                      //debugPrint('Input text : ${newMsg.messageContent}');
                      setState(() {
                        messages.add(newMsg);
                      }); //추가, 버튼을 누를 때 마다 리스트뷰 갱신
                    },
결과물을 이하와 같다.
메세지 입력에 따른 Chat Detail 화면의 디테일한 UI 수정
제대로된 채팅 앱처럼 만들기 위해서는 그 외에도 여러가지 자잘한 작업이 필요한데,
메세지 송신 후, 메세지 필드 비우기
화면을 보면 송신 후에도 입력했던 텍스트가 아직 텍스트 필드에 남아 있는 것을 알 수 있다.
이때도 역시 텍스트 필드에 있는 값을 제어하는 것이므로, TextEditingController에 구현되어있는clear()함수 호출하면 쉽게 텍스트 필드를 비워 줄 수 있다.텍스트 필드 멀티라인 입력
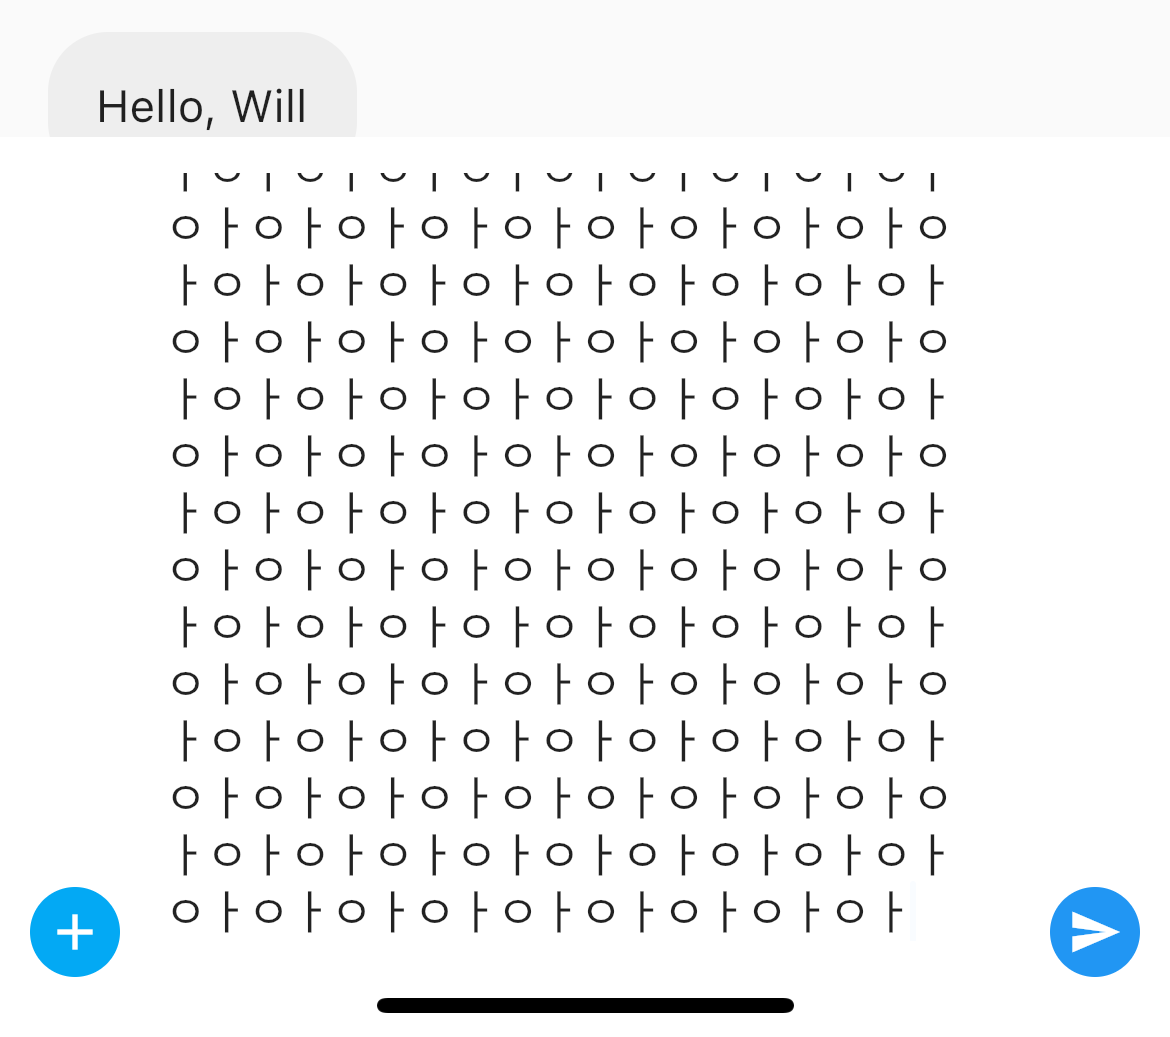
텍스트 필드에 메세지를 입력해보면, 텍스트 필드의 길이를 초과하는 메세지를 입력해도 개행이 되지 않는 것을 알 수 있다. 이것을 텍스트 필드의 길이에 맞춰 자동으로 개행이 되도록(=멀티라인 입력이 가능하도록) 수정해 주었다.바텀 높이 고정 해제, 맥스 높이 설정
2에서 기왕 멀티라인이 입력되게 해주었는데, 바텀의 높이가 60으로 고정이 되어있어서 멀티라인이 입력되는게 잘 보이지 않는다. 그러므로, 고정되어있는Container의 높이를 해제해 주고,ConstrainedBox위젯을 추가해 텍스트 필드로 인해 최대로 커질 수 있는 높이를 300으로 설정해 주었다.
수정 전
수정 후
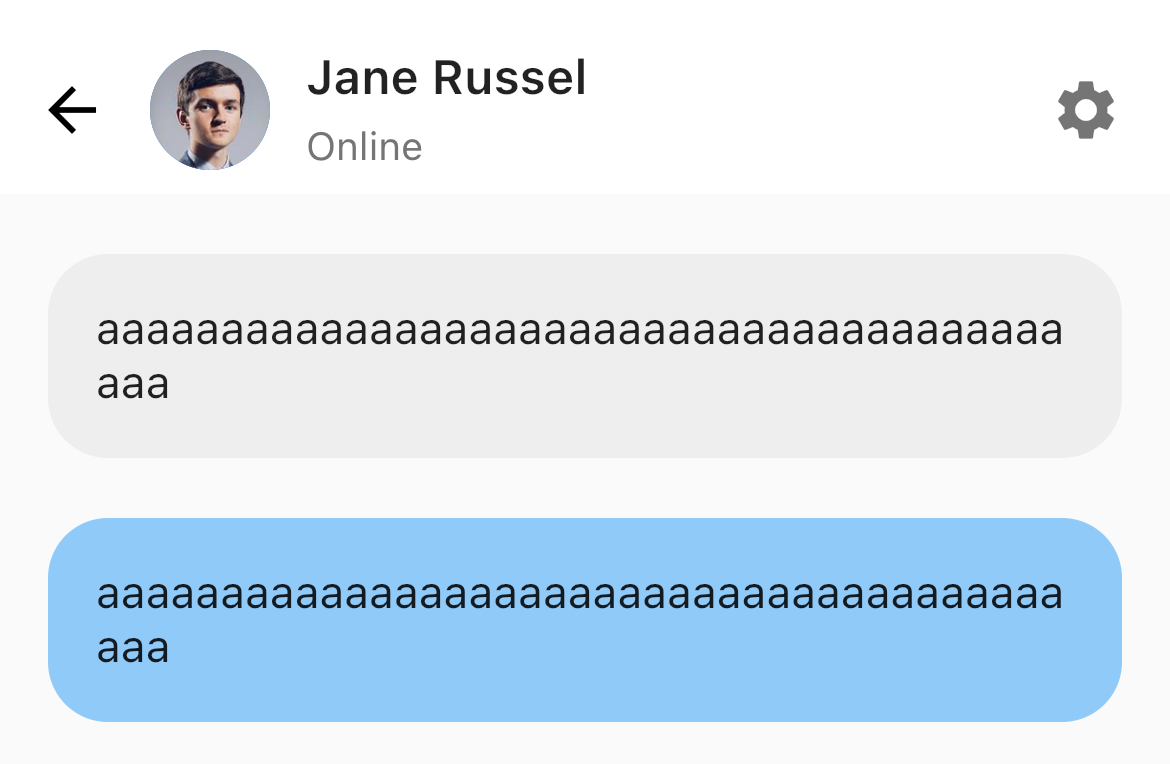
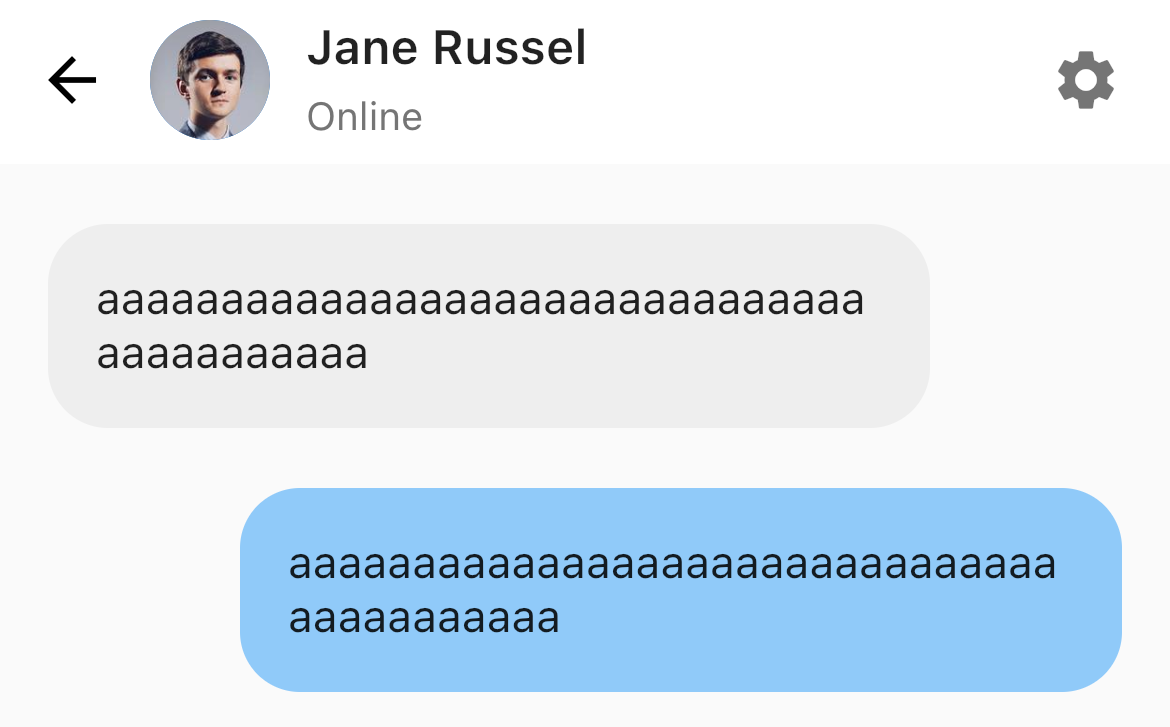
송신메세지와 수산메세지 박스 정렬 수정
이건 단순히 UI수정이므로, 취향에 따라 수정해 주면 된다.
장문의 메세지일 경우, 원래는 송신메세지 박스와 수신메세지 박스가 모두 화면에 꽉 차는 상태인데, 나는 수신메세지의 경우 오른쪽에 좀 간격을 남기고, 송신메세지의 경우 왼쪽에 좀더 간격을 남기도록 메세지 박스에 마진을 설정해 주었다.수정 전
수정 후
송신버튼 크기 고정
이것도 단순 UI 수정이므로 취향에 따라… 원문대로라면 송신 버튼이FloatingActionButton위젯으로 설정되어있어서, 텍스트 필드의 크기에 따라서 백그라운드의 크기가 멋대로 바뀔것이다. 매우 마음에 들지 않으므로 좌측의 버튼처럼 송신 버튼의 모양도SizedBox로 감싸서 높이와 크기를 고정해 주었다.
(3번의 스크린 샷에서 버튼이 고정되어있는 이유는 이미 수정 후에 스크린샷을 찍었기 때문)송신버튼,첨부버튼 위치 고정
이것도 단순 UI 수정이므로 취향에 따라… 마찬가지로 원문대로라면 좌측의 첨부 버튼, 송신 버튼 모두 텍스트 필드의 높이가 커짐에 따라서 위로 올라갈것이다.(높이 가운데 정렬이 됨) 나는 이걸 하단에 고정 시켜 주고 싶어서 정렬Row위젯에 정렬을 추가해 주었다.
(3번의 스크린 샷에서 버튼이 고정되어있는 이유는 이미 수정 후에 스크린샷을 찍었기 때문)- 입력이 있을 때만 메세지 전송
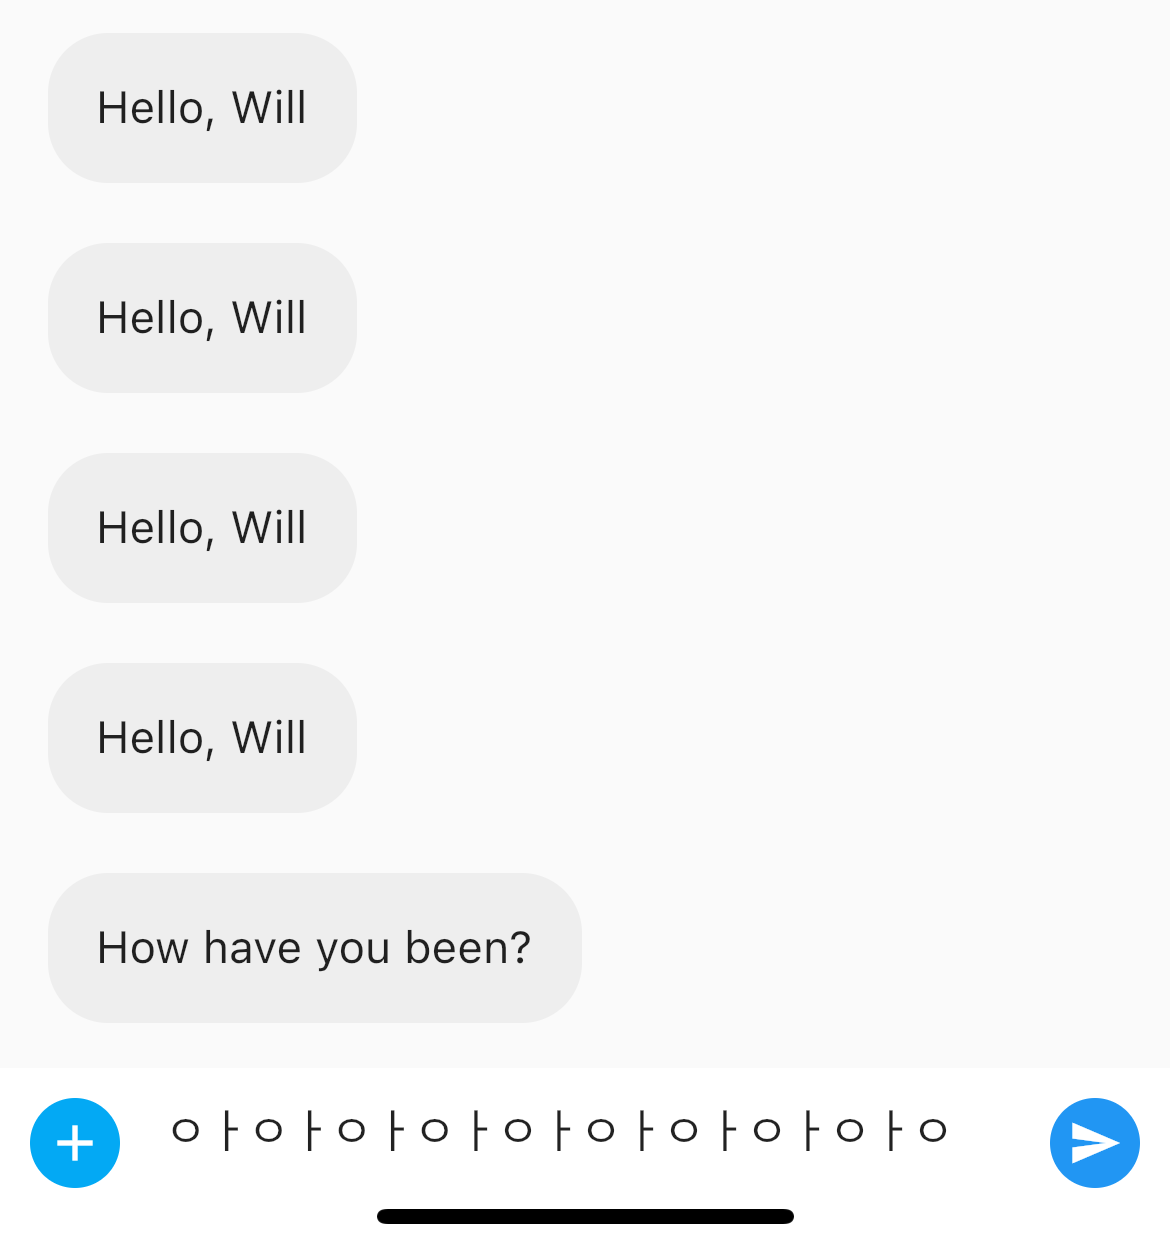
입력이 없을 때, 송신버튼을 눌러도 반응하지 않도록,FloatingActionButton위젯의onPressed함수에 조건문을 추가해 주었다.단, 지금은 스페이스 바나 엔터도 입력으로 취급한다. 나중에 걸러주는 코드를 추가할 예정…
메세지 로그 스크롤
메세지 로그를 표시하는Listview위젯이 스크롤이 되지 않아서 메세지 내용의 길이가 스크린 화면을 벗어나면 더 이상 내용을 볼 수가 없다. 그래서 메세지 로그를 표시하는 리스트 뷰 위젯을SingleChildScrollView위젯으로 감싸주었다.- 메세지 입력 시, 메세지 로그 가장 하단(최신)으로 이동
- 스크롤을 제어하기 위한 스크롤 컨트롤러를 선언해 준 후, 메세지 로그 부분에 스크롤 컨트롤러 추가
- 스크롤의 가장 마지막 부분으로 이동하는
_scrollToLatest라는 함수를 작성 FloatingActionButton위젯의onPressed함수에서 작성한_scrollToLatest를 호출
#수정 보류중인 오류
스크롤이 없다가 생기는 경우, (처음 한 줄만) 스크롤이 제대로 이동을 안함여기까지의
ChatDetailPage.dart전체 코드1 2 3 4 5 6 7 8 9 10 11 12 13 14 15 16 17 18 19 20 21 22 23 24 25 26 27 28 29 30 31 32 33 34 35 36 37 38 39 40 41 42 43 44 45 46 47 48 49 50 51 52 53 54 55 56 57 58 59 60 61 62 63 64 65 66 67 68 69 70 71 72 73 74 75 76 77 78 79 80 81 82 83 84 85 86 87 88 89 90 91 92 93 94 95 96 97 98 99 100 101 102 103 104 105 106 107 108 109 110 111 112 113 114 115 116 117 118 119 120 121 122 123 124 125 126 127 128 129 130 131 132 133 134 135 136 137 138 139 140 141 142 143 144 145 146 147 148 149 150 151 152 153 154 155 156 157 158 159 160 161 162 163 164 165 166 167 168 169 170 171 172 173 174 175 176 177 178 179 180 181 182 183 184 185 186 187 188 189 190 191 192 193 194 195 196 197 198 199 200 201 202 203 204 205 206 207 208 209 210 211 212 213 214 215 216 217 218 219 220 221 222 223 224 225 226 227 228 229 230 231 232
import 'package:flutter/foundation.dart'; import 'package:flutter/material.dart'; import 'package:flt_simple_chat_ex/models/chatMessageModel.dart'; class ChatDetailPage extends StatefulWidget { String cpname; String cpimageurl; ChatDetailPage({Key? key, required this.cpimageurl, required this.cpname}) : super(key: key); @override _ChatDetailPageState createState() => _ChatDetailPageState(); } class _ChatDetailPageState extends State<ChatDetailPage> { List<ChatMessage> messages = [ ChatMessage(messageContent: "Hello, Will", messageType: "receiver"), ChatMessage(messageContent: "Hello, Jane", messageType: "sender"), ]; final TextEditingController msgtextController = TextEditingController(); //9. 추가, 스크롤 컨트롤러 final ScrollController _scrollController = ScrollController(); //9. 추가, 리스트 뷰의 가장 마지막(최신부분)으로 스크롤 이동 void _scrollToLatest() { if (_scrollController.position.minScrollExtent == _scrollController.position.maxScrollExtent) { // 스크롤이 없을 때는, 스크롤 이동 하지 않음 } else { WidgetsBinding.instance.addPostFrameCallback((_) { _scrollController.jumpTo(_scrollController.position.maxScrollExtent); } ); } } @override Widget build(BuildContext context) { return Scaffold( appBar: AppBar( elevation: 0, automaticallyImplyLeading: false, backgroundColor: Colors.white, flexibleSpace: SafeArea( child: Container( padding: EdgeInsets.only(right: 16), child: Row( children: <Widget>[ IconButton( onPressed: () { Navigator.pop(context); }, icon: Icon( Icons.arrow_back, color: Colors.black, ), ), SizedBox( width: 2, ), CircleAvatar( backgroundImage: NetworkImage(widget.cpimageurl), maxRadius: 20, ), SizedBox( width: 12, ), Expanded( child: Column( crossAxisAlignment: CrossAxisAlignment.start, mainAxisAlignment: MainAxisAlignment.center, children: <Widget>[ Text( widget.cpname, style: TextStyle( fontSize: 16, fontWeight: FontWeight.w600), ), SizedBox( height: 6, ), Text( "Online", style: TextStyle( color: Colors.grey.shade600, fontSize: 13), ), ], ), ), Icon( Icons.settings, color: Colors.black54, ), ], ), ), ), ), body: Stack( children: <Widget>[ SingleChildScrollView( //8. 추가, 메세지 로그 스크롤 뷰 physics: BouncingScrollPhysics(), //8. 추가, 메세지 로그 스크롤 뷰 controller: _scrollController, //9. 추가, 스크롤 컨트롤러 child: ListView.builder( itemCount: messages.length, shrinkWrap: true, padding: EdgeInsets.only(top: 10, bottom: 70), physics: NeverScrollableScrollPhysics(), itemBuilder: (context, index) { return Container( padding: EdgeInsets.only(left: 16, right: 16, top: 10, bottom: 10), child: Align( alignment: (messages[index].messageType == "receiver" ? Alignment.topLeft : Alignment.topRight), child: Container( decoration: BoxDecoration( borderRadius: BorderRadius.circular(20), color: (messages[index].messageType == "receiver" ? Colors.grey.shade200 : Colors.blue[200]), ), padding: EdgeInsets.all(16), //4. 추가, 송신메세지(오른쪽 정렬, 왼쪽 간격 남기기)와 수산메세지(왼쪽 정렬, 오른쪽 간격 남기기) 박스 정렬 수정 margin: (messages[index].messageType == "receiver" ? EdgeInsets.only( left: 0, right: 64, top: 0, bottom: 0) : EdgeInsets.only( left: 64, right: 0, top: 0, bottom: 0)), //4. 추가 END child: Text( messages[index].messageContent, style: TextStyle(fontSize: 15), ), ), ), ); }, ), ), Align( alignment: Alignment.bottomLeft, child: ConstrainedBox( //3. 추가, 바텀의 맥스 높이 설정 constraints: BoxConstraints( maxHeight: 300, ), child: Container( padding: EdgeInsets.only( left: 10, bottom: 20, top: 0), //수정(임시), bottom10 top10 //height: 60, //3. 삭제, 바텀 고정 높이 해제 width: double.infinity, color: Colors.white, child: Row( crossAxisAlignment: CrossAxisAlignment .end, //6. 추가, 텍스트 필드가 길어져도 첨부, 송신버튼 하단으로 고정 children: <Widget>[ GestureDetector( onTap: () {}, child: Container( height: 30, width: 30, decoration: BoxDecoration( color: Colors.lightBlue, borderRadius: BorderRadius.circular(30), ), child: Icon( Icons.add, color: Colors.white, size: 20, ), ), ), SizedBox( width: 15, ), Expanded( child: TextField( decoration: InputDecoration( hintText: "Write message...", hintStyle: TextStyle(color: Colors.black54), border: InputBorder.none), controller: msgtextController, keyboardType: TextInputType.multiline, //2. 추가, 멀티라인 입력 가능하도록 maxLines: null, //2. 추가, 멀티라인 제한 없음 ), ), SizedBox( width: 15, ), //5. 추가, FloatingActionButton을 SizedBox로 감싸주고 height, width 설정 SizedBox( height: 30, width: 50, child: FloatingActionButton( onPressed: () { if (msgtextController.text.isNotEmpty) { //7. 추가, 입력이 있을 때만 전송 ChatMessage newMsg = ChatMessage( messageContent: msgtextController.text, messageType: "sender"); //debugPrint('Input text : ${newMsg.messageContent}'); setState(() { messages.add(newMsg); msgtextController.clear(); //1. 추가, 버튼을 누른 후 텍스트 필드 클리어 }); _scrollToLatest(); //9. 추가, 메세지 송신시, 가장 메세지 로그의 가장 최신 부분으로 이동 } }, child: Icon( Icons.send, color: Colors.white, size: 18, ), backgroundColor: Colors.blue, elevation: 0, ), ), ], ), ), ), ), ], ), ); } }
메세지 입력 시, 텍스트 필드 크기에 따라 메세지 로그 범위도 변경
텍스트 필드의 높이가 높아지면, 메세지 로그 부분이 텍스트 필드에 맞춰서 위로 밀려났으면 좋겠는데, 지금은 그저 텍스트 필드가 커지는 만큼 메세지 로그가 가려져서 안보일 뿐이다.
수정해준 작업은 이하와 같다.- 메세지 로그와 바텀(입력부분)을 포함하는
body의 위젯의 종류를Stack에서Column으로 변경 - 그에 따라 변경된 자식 위젯들의 레이아웃을 수정하기 위해, 메세지 로그를 표시하는
SingleChildScrollView위젯 밑에Flexible위젯을 하나더 깔아 줌 - 위젯의 크기를 취득, 갱신하는
_getWidgetInfo와_updateWidgetInfo함수를 작성 - 텍스트 필드의 입력을 감지해서 바텀 부분의 위젯 높이가 변경될 경우 스크롤을 업데이트하도록 수정
#수정 보류중인 오류
9번과 마찬가지로 맨 처음 개행이 될 때, (처음 한 문자만) 스크롤이 제대로 이동을 안함- 메세지 로그와 바텀(입력부분)을 포함하는
- 스크롤이 메세지 로그 중간이 위치해 있을 경우, 입력도중에 바텀 크기가 바뀌어도 보던 화면 유지
#수정 보류중인 오류
이것도 취향인데, 과거의 메세지를 보면서 텍스트 필더에 글을 입력할 때, 텍스트 필더의 높이가 높아져도 보던 메세지가 그대로 유지 되었으면 좋겠다. (지금은 그냥 텍스트 필더에 덮임) 오프셋 계산하고 어쩌고 하면 될거같은데, 보류중,,,여기까지의
ChatDetailPage.dart전체 코드1 2 3 4 5 6 7 8 9 10 11 12 13 14 15 16 17 18 19 20 21 22 23 24 25 26 27 28 29 30 31 32 33 34 35 36 37 38 39 40 41 42 43 44 45 46 47 48 49 50 51 52 53 54 55 56 57 58 59 60 61 62 63 64 65 66 67 68 69 70 71 72 73 74 75 76 77 78 79 80 81 82 83 84 85 86 87 88 89 90 91 92 93 94 95 96 97 98 99 100 101 102 103 104 105 106 107 108 109 110 111 112 113 114 115 116 117 118 119 120 121 122 123 124 125 126 127 128 129 130 131 132 133 134 135 136 137 138 139 140 141 142 143 144 145 146 147 148 149 150 151 152 153 154 155 156 157 158 159 160 161 162 163 164 165 166 167 168 169 170 171 172 173 174 175 176 177 178 179 180 181 182 183 184 185 186 187 188 189 190 191 192 193 194 195 196 197 198 199 200 201 202 203 204 205 206 207 208 209 210 211 212 213 214 215 216 217 218 219 220 221 222 223 224 225 226 227 228 229 230 231 232 233 234 235 236 237 238 239 240 241 242 243 244 245 246 247 248 249 250 251 252 253 254 255 256 257 258 259 260 261 262 263 264 265 266 267 268 269 270 271 272 273 274 275 276 277 278 279 280 281 282 283 284 285 286 287 288 289 290 291 292 293 294 295 296 297 298 299 300 301 302 303 304 305 306 307 308 309 310 311 312 313 314 315 316 317 318 319 320 321 322 323 324 325 326 327 328 329 330 331 332 333 334 335 336 337 338 339 340 341 342 343 344 345 346 347 348 349 350 351 352 353 354 355 356 357 358 359 360 361 362 363 364 365 366 367 368 369
import 'package:flutter/foundation.dart'; import 'package:flutter/material.dart'; import 'package:flt_simple_chat_ex/models/chatMessageModel.dart'; class ChatDetailPage extends StatefulWidget { String cpname; String cpimageurl; ChatDetailPage({Key? key, required this.cpimageurl, required this.cpname}) : super(key: key); @override _ChatDetailPageState createState() => _ChatDetailPageState(); } class _ChatDetailPageState extends State<ChatDetailPage> { List<ChatMessage> messages = [ ChatMessage(messageContent: "Hello, Will", messageType: "receiver"), ChatMessage(messageContent: "Hello, Jane", messageType: "sender"), ChatMessage(messageContent: "aaaaaaaaaaaa", messageType: "receiver"), ChatMessage(messageContent: "bbbbbbbbbbbb", messageType: "sender"), ChatMessage(messageContent: "cccccccccccc", messageType: "receiver"), ChatMessage(messageContent: "dddddddddddd", messageType: "sender"), ]; final TextEditingController msgtextController = TextEditingController(); //9. 추가, 스크롤 컨트롤러 final ScrollController _scrollController = ScrollController(); //9. 추가, 리스트 뷰의 가장 마지막(최신부분)으로 스크롤 이동 void _scrollToLatest() { print(_scrollController.position); int scrstatus = _scrollStatusChecker(); if (scrstatus == 0) { // 스크롤이 없을 때는, 스크롤 이동 하지 않음 print("No Scroll"); } else if (scrstatus == 1) { WidgetsBinding.instance.addPostFrameCallback((_) { _scrollController.jumpTo(_scrollController.position.maxScrollExtent); }); } else if (scrstatus == 2) { WidgetsBinding.instance.addPostFrameCallback((_) { _scrollController.jumpTo(_scrollController.position.maxScrollExtent); }); } else { print("scroll error"); } } void _scrollUpdater() { print(_scrollController.position); int scrstatus = _scrollStatusChecker(); if (scrstatus == 0) { // 스크롤이 없을 때는, 스크롤 이동 하지 않음 print("No Scroll"); } else if (scrstatus == 1) { WidgetsBinding.instance.addPostFrameCallback((_) { _scrollController.jumpTo(_scrollController.position.maxScrollExtent); }); } else if (scrstatus == 2 && _currentbottomheight == _minbottomheight) { WidgetsBinding.instance.addPostFrameCallback((_) { _scrollController.jumpTo(_scrollController.position.maxScrollExtent); }); } else if (scrstatus == 2 && _currentbottomheight != _minbottomheight) { WidgetsBinding.instance.addPostFrameCallback((_) { //11. 입력도중에 바텀 크기가 바뀌어도 보던 화면 유지해주고 싶음 (미구현) _scrollController.jumpTo(_scrollController.offset); }); } else { print("scroll error"); } } int _scrollStatusChecker() { int scrsta; if (_scrollController.position.minScrollExtent == _scrollController.position.maxScrollExtent) { // 스크롤이 없음 scrsta = 0; } else if (_scrollController.offset == _scrollController.position.maxScrollExtent) { // 스크롤이 최하단에 위치 scrsta = 1; } else { // 스크롤이 화면 중간에 위치 scrsta = 2; } return scrsta; } // 바텀 위젯 높이 변수 정의 final double _maxbottomheight = 300; //바텀 높이 (맥시멈, 고정) double _minbottomheight = 0; //바텀 높이 (미니멈) double _currentbottomheight = 0; //바텀 높이 (현재) // 위젯(바텀,ConstrainedBox)용 키 final GlobalKey _widgetKey = GlobalKey(); @override void initState() { super.initState(); // 바텀 높이 초기 셋팅 WidgetsBinding.instance.addPostFrameCallback(_getWidgetInfo); } //10. 추가, 위젯의 크기 정보 취득 (초기 세팅) void _getWidgetInfo(_) { final RenderBox renderBox = _widgetKey.currentContext?.findRenderObject() as RenderBox; final Size size = renderBox.size; double wgwidth = size.width; double wgheight = size.height; _minbottomheight = wgheight; _currentbottomheight = wgheight; print('Size: ${wgwidth}, ${wgheight}'); final Offset offset = renderBox.localToGlobal(Offset.zero); print('Offset: ${offset.dx}, ${offset.dy}'); print( 'Position: ${(offset.dx + size.width) / 2}, ${(offset.dy + size.height) / 2}'); } // END, 위젯의 크기 정보 취득 //10. 추가, 위젯 정보 갱신 void _updateWidgetInfo() { final RenderBox renderBox = _widgetKey.currentContext?.findRenderObject() as RenderBox; final Size size = renderBox.size; double wgwidth = size.width; double wgheight = size.height; _currentbottomheight = wgheight; print('Size: ${wgwidth}, ${wgheight}'); final Offset offset = renderBox.localToGlobal(Offset.zero); print('Offset: ${offset.dx}, ${offset.dy}'); print( 'Position: ${(offset.dx + size.width) / 2}, ${(offset.dy + size.height) / 2}'); } // END, 위젯 정보 갱신 @override Widget build(BuildContext context) { double responsiveHeight = MediaQuery.of(context).size.height; print("responsiveHeight ${responsiveHeight}"); return Scaffold( //resizeToAvoidBottomInset: true, appBar: AppBar( elevation: 0, automaticallyImplyLeading: false, backgroundColor: Colors.white.withOpacity(0.5), flexibleSpace: SafeArea( child: Container( padding: EdgeInsets.only(right: 16), child: Row( children: <Widget>[ IconButton( onPressed: () { Navigator.pop(context); }, icon: Icon( Icons.arrow_back, color: Colors.black, ), ), SizedBox( width: 2, ), CircleAvatar( backgroundImage: NetworkImage(widget.cpimageurl), maxRadius: 20, ), SizedBox( width: 12, ), Expanded( child: Column( crossAxisAlignment: CrossAxisAlignment.start, mainAxisAlignment: MainAxisAlignment.center, children: <Widget>[ Text( widget.cpname, style: TextStyle( fontSize: 16, fontWeight: FontWeight.w600), ), SizedBox( height: 6, ), Text( "Online", style: TextStyle( color: Colors.grey.shade600, fontSize: 13), ), ], ), ), Icon( Icons.settings, color: Colors.black54, ), ], ), ), ), ), body: Column( //10. 수정, Stack -> Column children: <Widget>[ Flexible( //10. 수정, Container -> Flexible fit: FlexFit.tight, //10. 추가, 여분 화면 없이 메세지 로그 화면 확장 // 추가, 컨테이너 위젯 > 마진 추가하기 위해 child: SingleChildScrollView( //8. 추가, 메세지 로그 스크롤 뷰 physics: BouncingScrollPhysics(), //8. 추가, 메세지 로그 스크롤 뷰 controller: _scrollController, //9. 추가, 스크롤 컨트롤러 child: ListView.builder( itemCount: messages.length, shrinkWrap: true, padding: EdgeInsets.only( top: 10), //삭제, 컨테이너 위젯에 마진추가해 줬기 때문에 bottom: 70 삭제 physics: NeverScrollableScrollPhysics(), itemBuilder: (context, index) { return Container( padding: EdgeInsets.only( left: 16, right: 16, top: 10, bottom: 10), child: Align( alignment: (messages[index].messageType == "receiver" ? Alignment.topLeft : Alignment.topRight), child: Container( decoration: BoxDecoration( borderRadius: BorderRadius.circular(20), color: (messages[index].messageType == "receiver" ? Colors.grey.shade200 : Colors.blue[200]), ), padding: EdgeInsets.all(16), //4. 추가, 송신메세지(오른쪽 정렬, 왼쪽 간격 남기기)와 수산메세지(왼쪽 정렬, 오른쪽 간격 남기기) 박스 정렬 수정 margin: (messages[index].messageType == "receiver" ? EdgeInsets.only( left: 0, right: 64, top: 0, bottom: 0) : EdgeInsets.only( left: 64, right: 0, top: 0, bottom: 0)), //4. 추가 END child: Text( messages[index].messageContent, style: TextStyle(fontSize: 15), ), ), ), ); }, ), ), ), Align( alignment: Alignment.bottomLeft, child: ConstrainedBox( key: _widgetKey, //추가, 위젯 정보 얻기 위한 키 //3. 추가, 바텀의 맥스 높이 설정 constraints: BoxConstraints( maxHeight: _maxbottomheight, ), child: Container( //추가, 바텀의 맥스 높이 설정 padding: EdgeInsets.only( left: 10, bottom: 20, top: 0), //수정(임시), bottom10 top10 //height: 60, //3. 삭제, 바텀 고정 높이 해제 width: double.infinity, color: Colors.grey.withOpacity(0.3), child: Row( crossAxisAlignment: CrossAxisAlignment .end, //6. 추가, 텍스트 필드가 길어져도 첨부, 송신버튼 하단으로 고정 children: <Widget>[ GestureDetector( onTap: () {}, child: Container( height: 30, width: 30, decoration: BoxDecoration( color: Colors.lightBlue, borderRadius: BorderRadius.circular(30), ), child: Icon( Icons.add, color: Colors.white, size: 20, ), ), ), SizedBox( width: 15, ), Expanded( child: TextField( decoration: InputDecoration( hintText: "Write message...", hintStyle: TextStyle(color: Colors.black54), border: InputBorder.none), controller: msgtextController, onChanged: (text) { //텍스트 필드의 내용이 변경될 때 마다 감지 _updateWidgetInfo(); //10. 추가, 바텀 높이를 if (_currentbottomheight != _minbottomheight) { //10. 추가, 텍스트 필드 높이가 변하면 스크롤도 이동해줌 _scrollUpdater(); } }, keyboardType: TextInputType.multiline, //2. 추가, 멀티라인 입력 가능하도록 maxLines: null, //2. 추가, 멀티라인 제한 없음 ), ), SizedBox( width: 15, ), //5. 추가, FloatingActionButton을 SizedBox로 감싸주고 height, width 설정 SizedBox( height: 30, width: 50, child: FloatingActionButton( onPressed: () { if (msgtextController.text.isNotEmpty) { //7. 추가, 입력이 있을 때만 전송 ChatMessage newMsg = ChatMessage( messageContent: msgtextController.text, messageType: "sender"); debugPrint('Input text : ${newMsg.messageContent}'); setState(() { messages.add(newMsg); msgtextController .clear(); //1. 추가, 버튼을 누른 후 텍스트 필드 클리어 }); _scrollToLatest(); //9. 추가, 메세지 송신시, 가장 메세지 로그의 가장 최신 부분으로 이동 } }, child: Icon( Icons.send, color: Colors.white, size: 18, ), backgroundColor: Colors.blue, elevation: 0, ), ), ], ), ), ), ), ], ), ); } }


flutter 기초 : 참고하기 좋은 사이트
후기
포스트를 작성하면서 느낀 점
- 다트에서는 대체로 위젯이라는 용어를 쓰나본데, 아직 클래스나 객체라는 단어가 익숙해서 혼동해서 쓰게 된다.
- 자잘한 수정은 한 개 수정할 때마다 코드를 첨부하기가 애매해서 번호를 매겨서 설명만 쭉 작성 후, 마지막에 전체 코드를 첨부, 코드안에 주석으로 몇 번에 해당하는 수정, 추가 사항인지 작성했다.
- 위의 전체 코드에서 10번, 11번을 포함시키지 않은 이유는, 지금까지 썼던 베이스 위젯의 종류를 아예 바꾸는 등 수정한 내용이 많았기 때문이다.
- 뭐든 그렇겠지만 처음부터 무슨 기능을 구현하고 싶은지 염두에 두고 알맞은 위젯을 쓰는게 가장 효율적일텐데 그게 참 어려운 부분이지…